

The Wolf Moon Observatory
Hawk’s Grove, Wisconsin
This is a short video, showing the first time we opened the observatory’s roof! (We had to let the first snow of the season melt!)
Update: 10 April 2024!
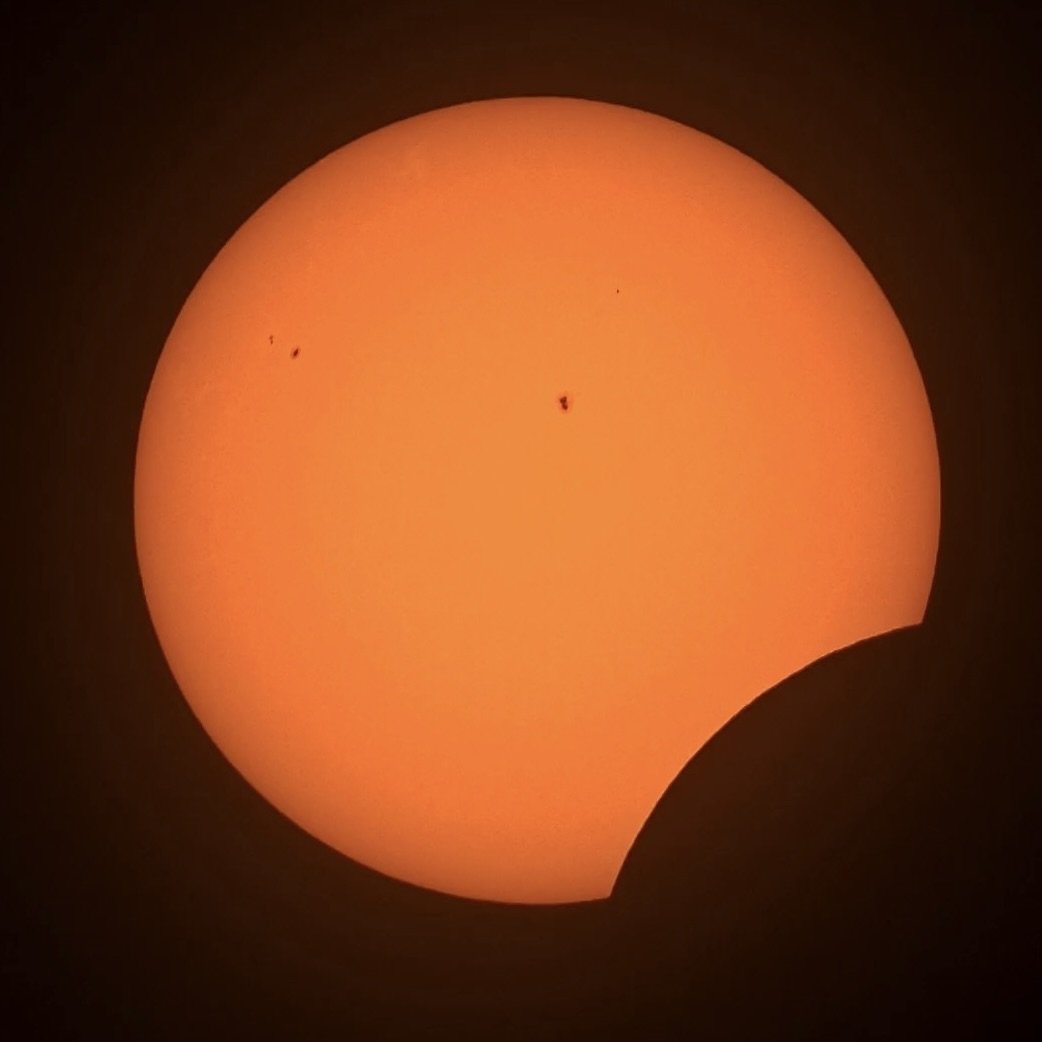
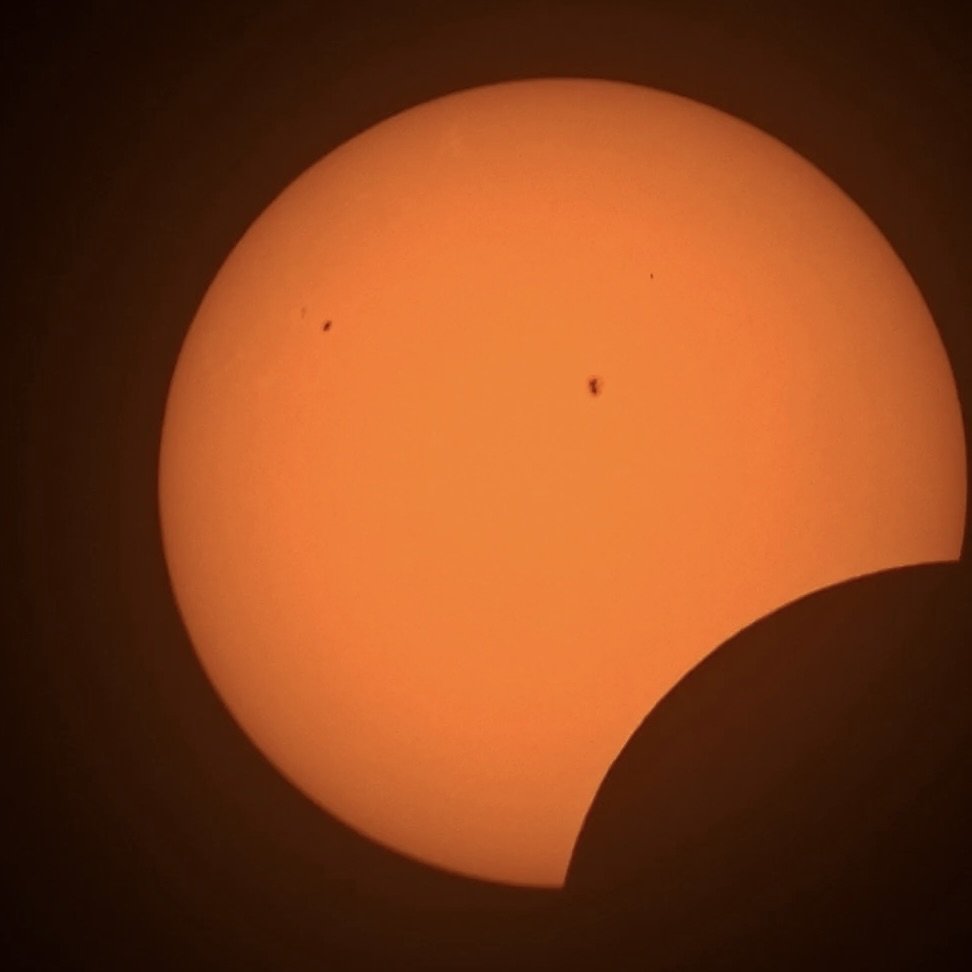
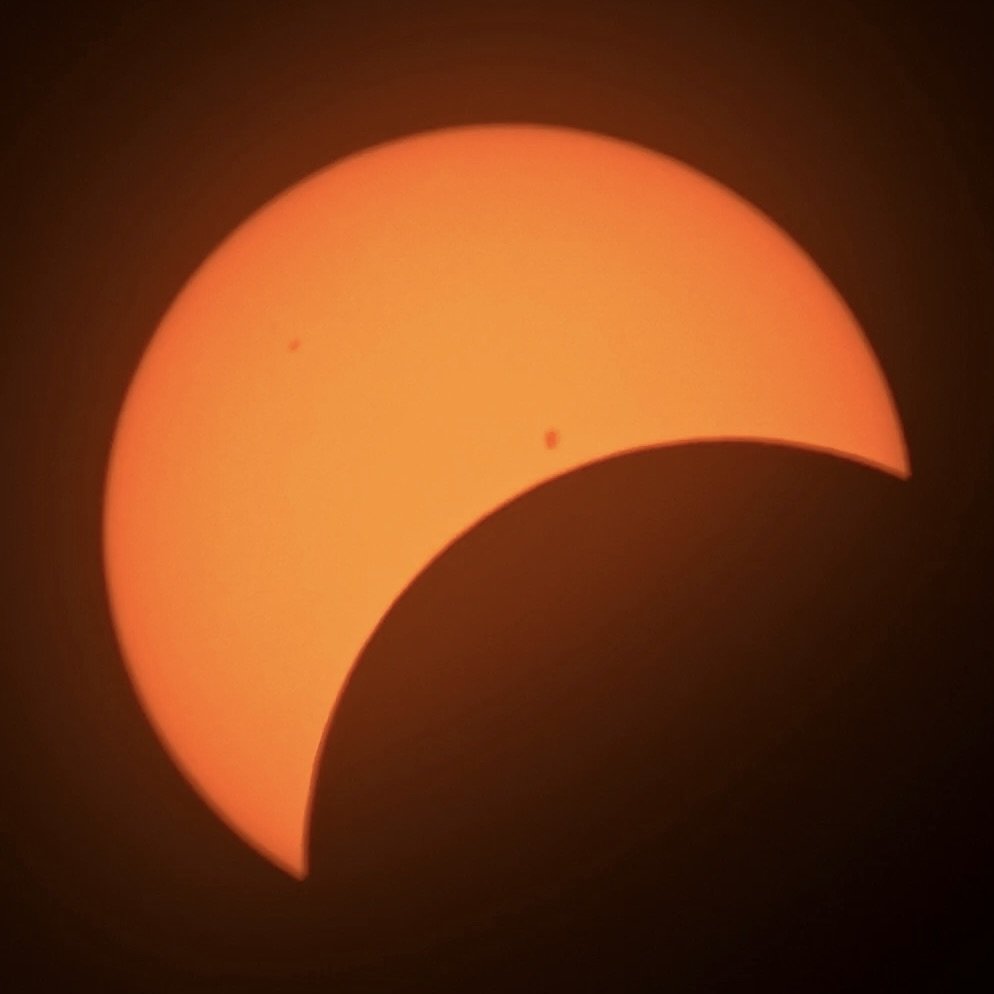
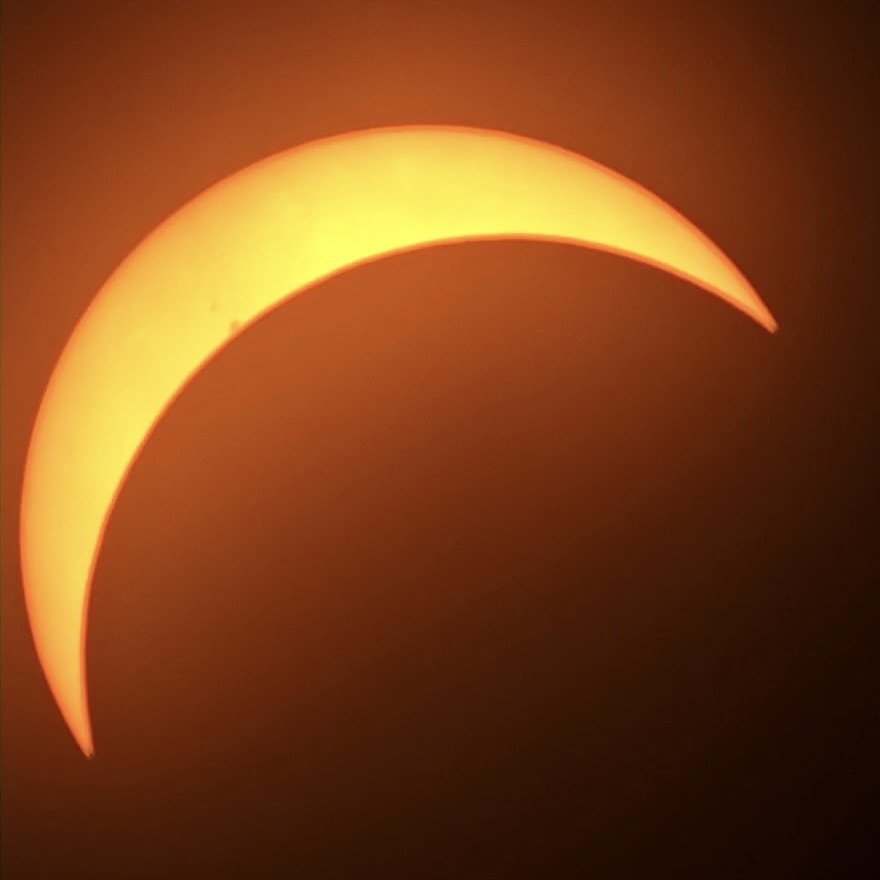
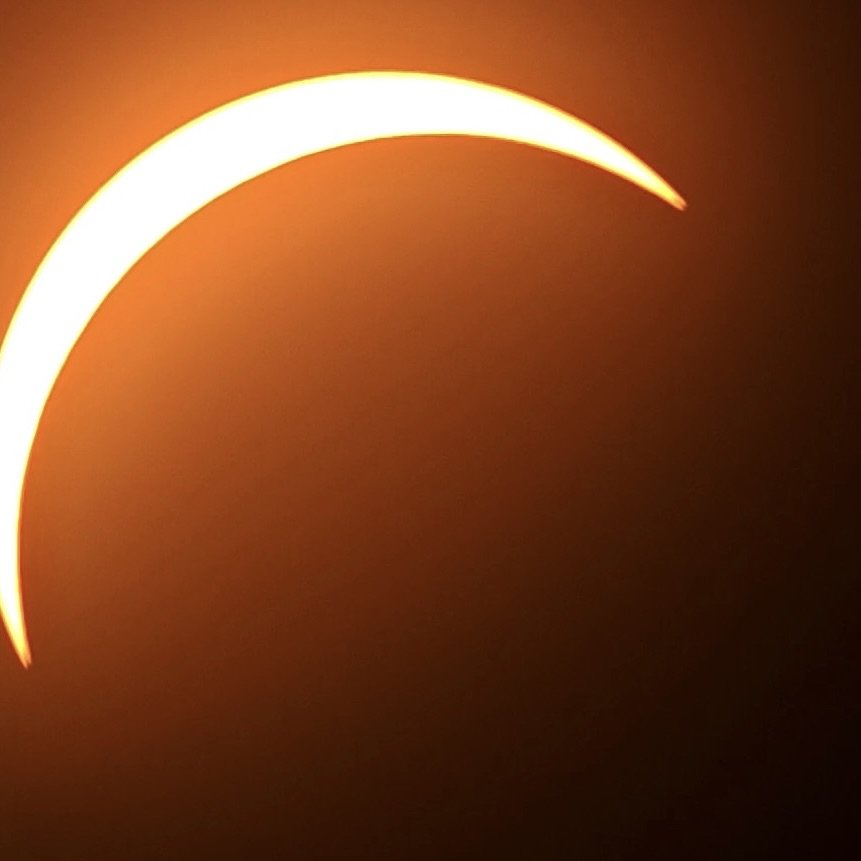
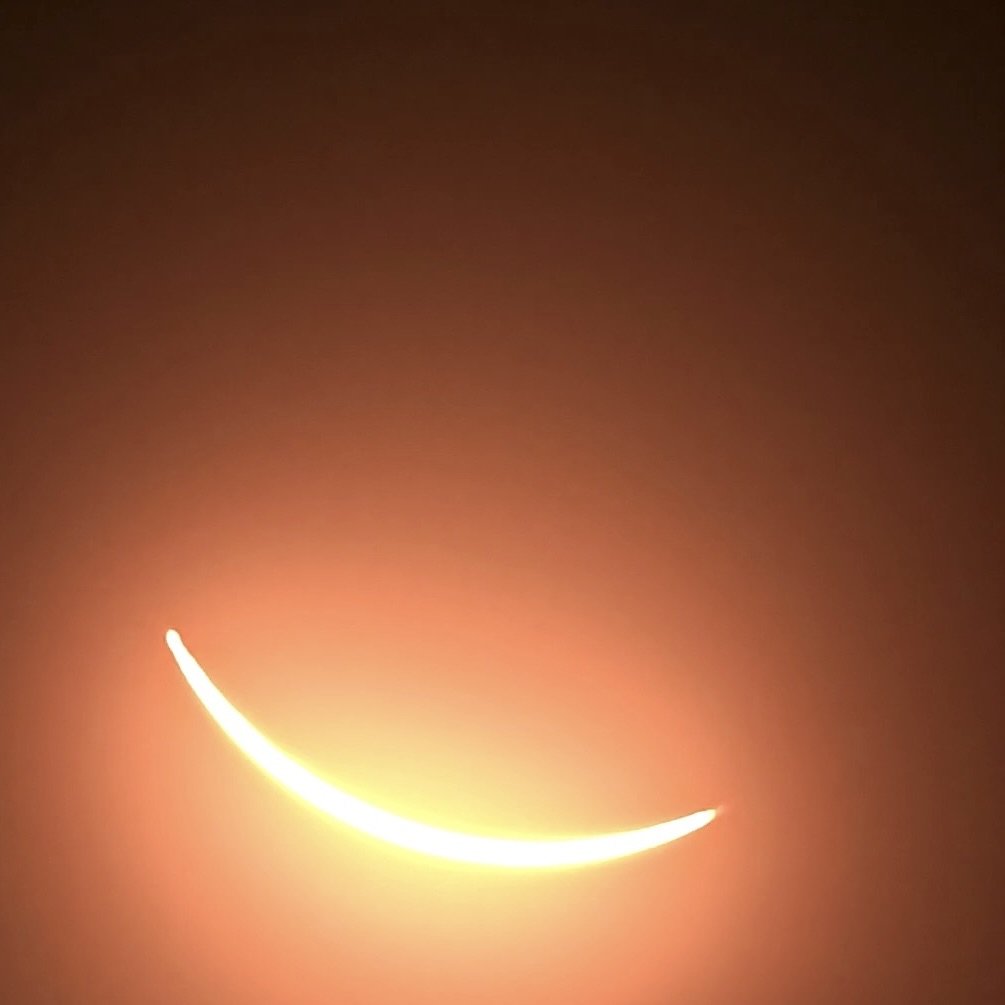
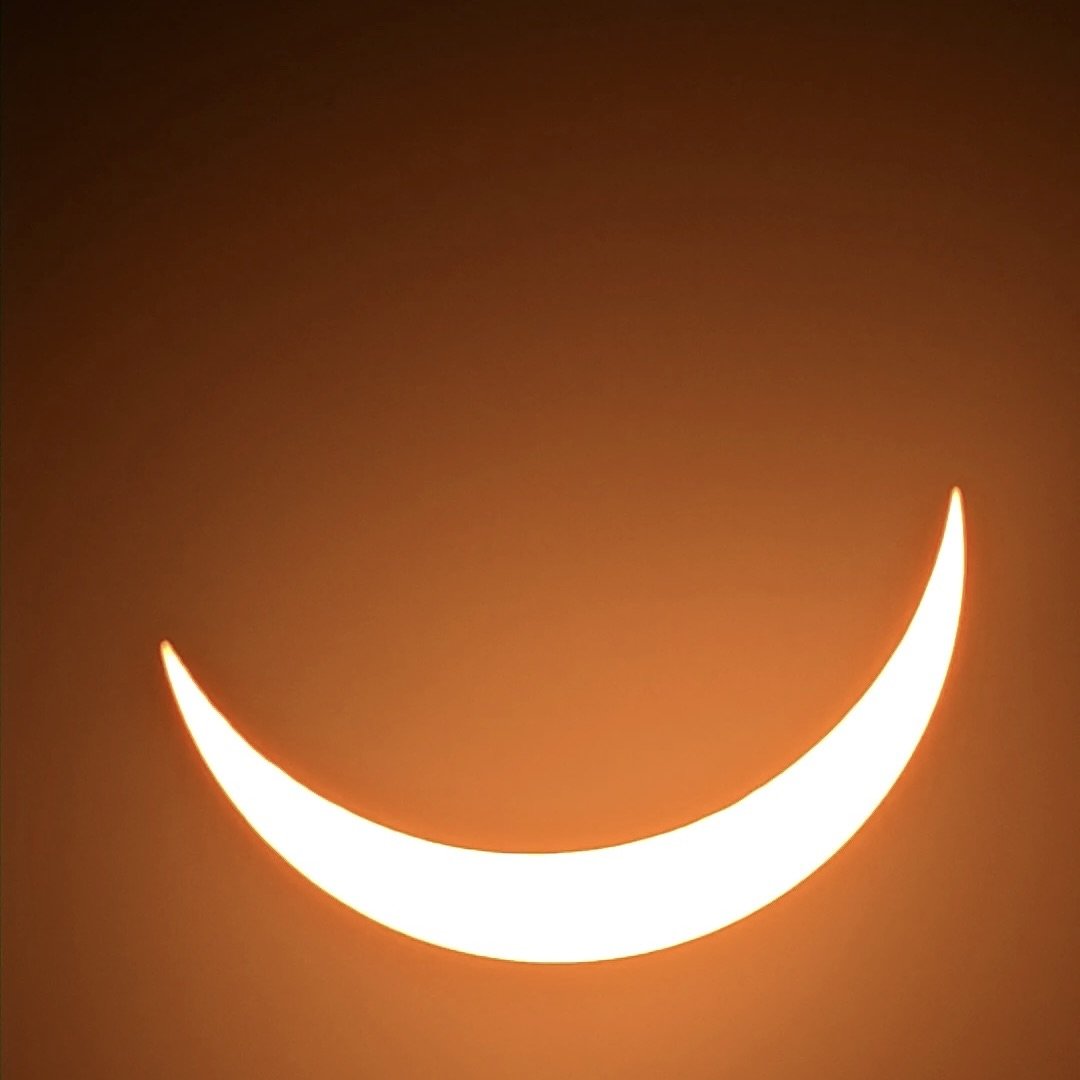
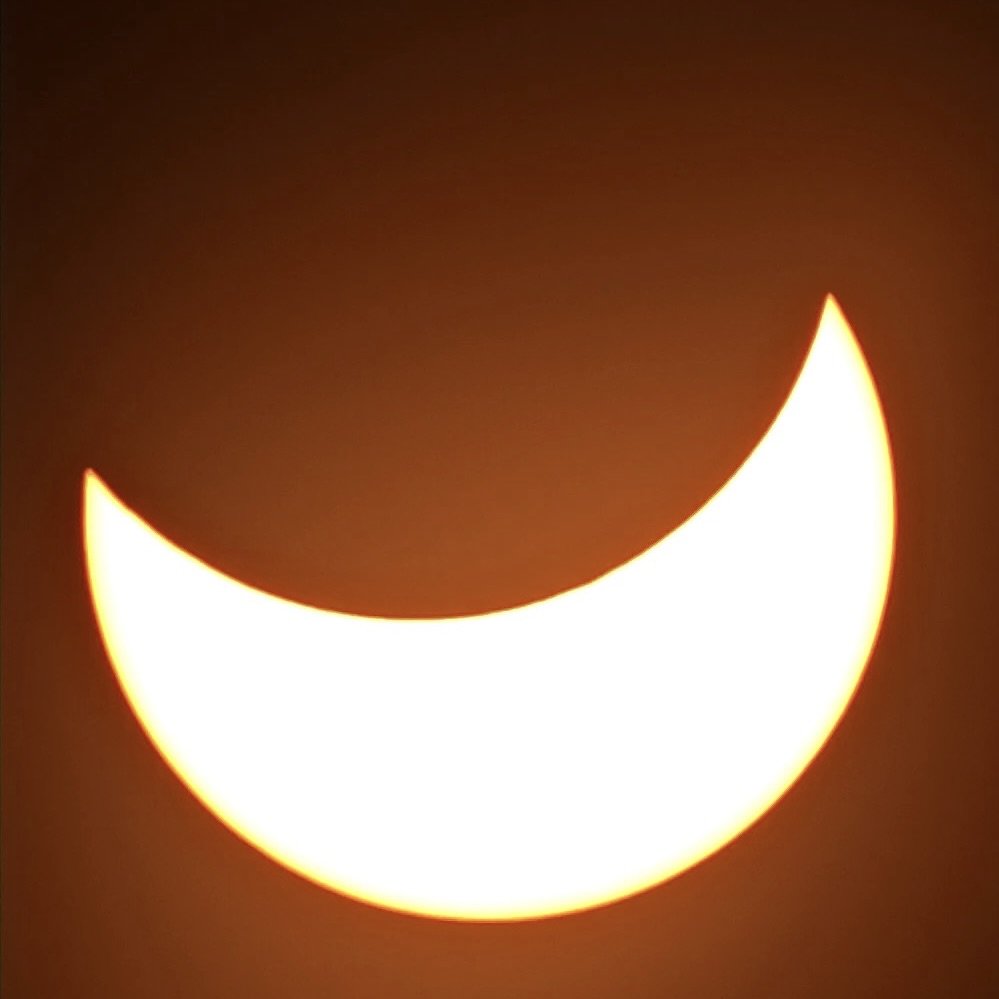
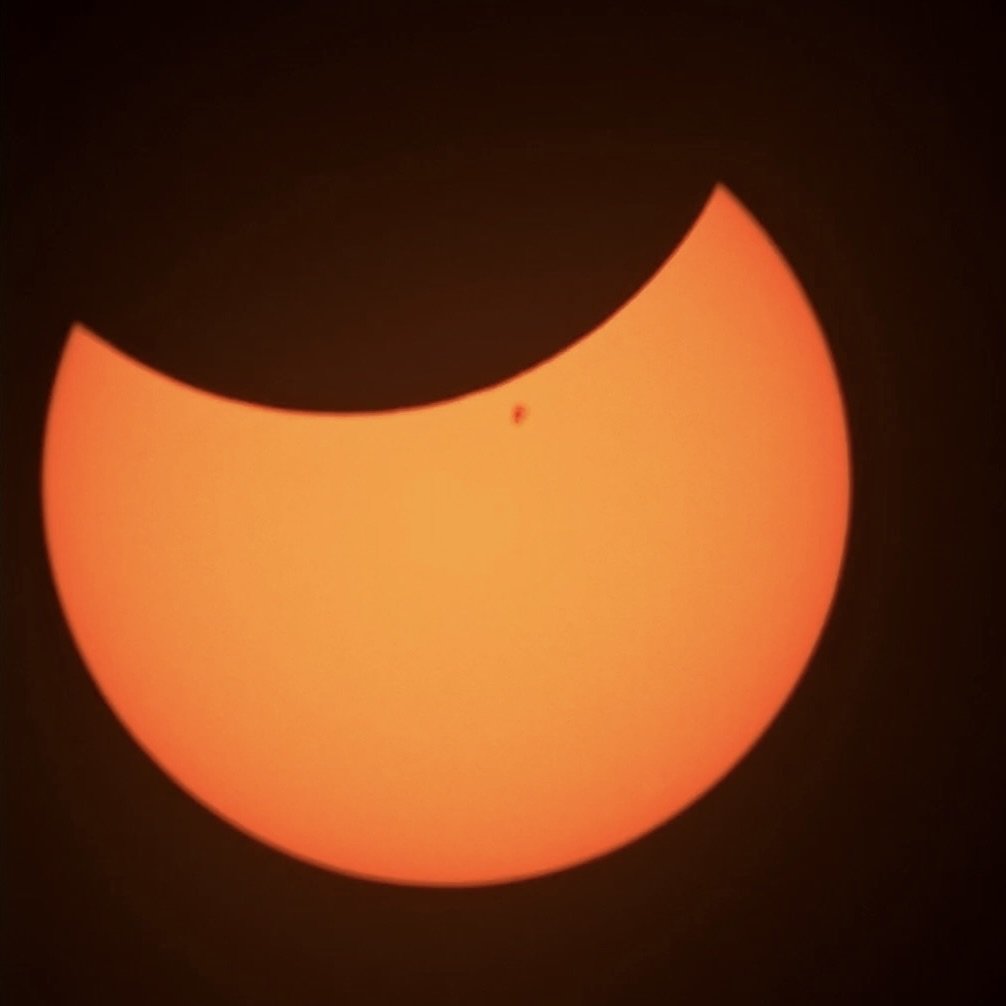
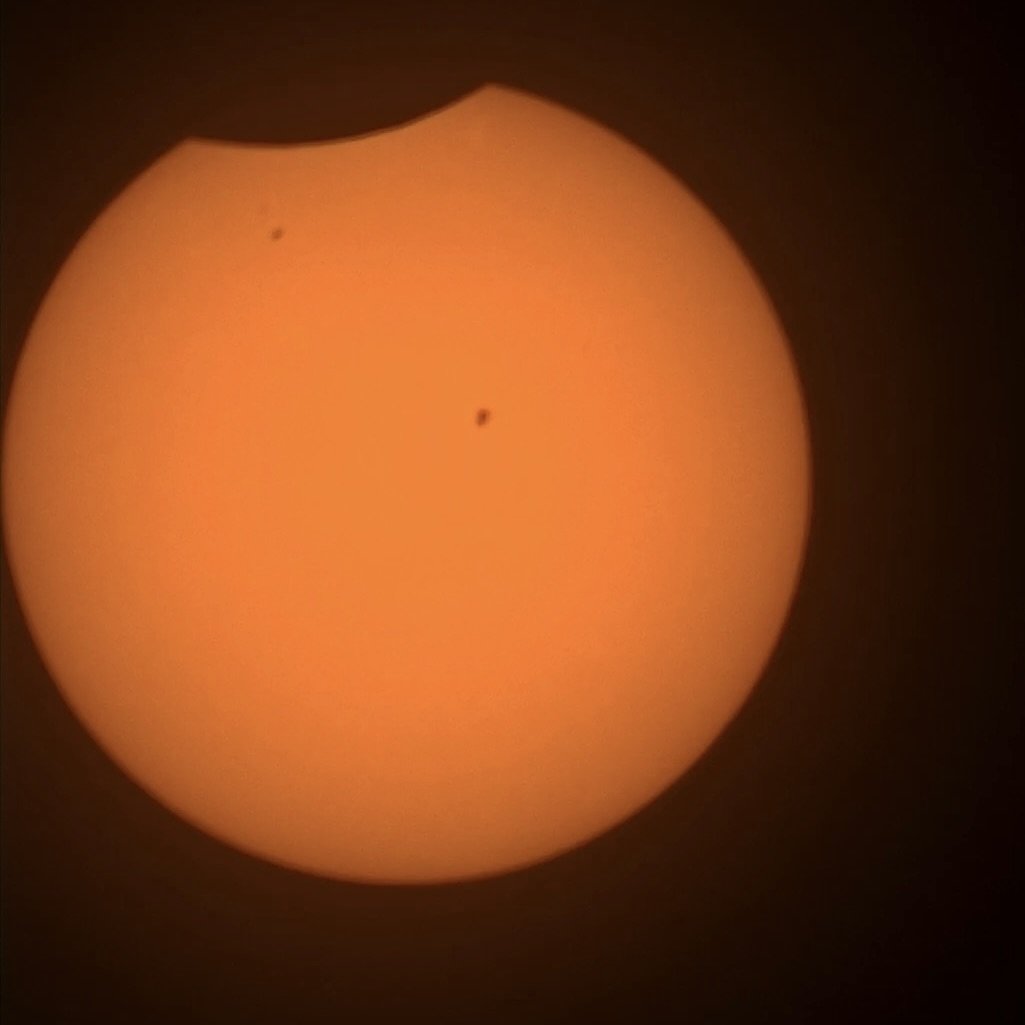
Here are a few of the pictures we took during April’s total solar eclipse. (April 8, 2024)
We watched the entire event from Plain City, OH (near Columbus) and enjoyed about a minute and a half of totality. We did not take any pictures of totality, because I decided to just sit back and enjoy the sight.


I will post new images here (once I start getting a few someone else might enjoy). For now, here are some notes about the observatory and an introduction to our astronomy gear.

Our first image!
And this was just with a cell phone!
The next time you’re traveling by air and have reached cruising altitude, why not glance out the window to view the countryside? At a minimum, you’re likely 32,000 feet above the ground. Wow! You’re SIX MILES UP! But what if a ginormous rock still touched the ground and the airplane’s underbelly at the same time? Go ahead. Try to picture that. The asteroid that annihilated the dinosaurs was also six miles across. So, now, maybe you can picture the size of that giant space rock a little better. Of course, that was before that asteroid smashed a crater 110 miles across and 12 miles deep!
Okay, but that was 65 million years ago. It’s 2024. How often do “larger than average” asteroids enter Earth’s atmosphere? Well, at this end of our cosmic shooting gallery, asteroids create recorded “bolides” (bright fireballs) about once every 13 days. I witnessed my first such streaking meteor way back in 1972. Even now, I can watch it like a video clip in my mind. But maybe you remember the Chelyabinsk meteor that a lot of Russians filmed on February 15, 2013. At 66 feet across, the rock was only about the size of a large house!
Why am I telling you this? One of my missions at the Wolf Moon Observatory involves tracking and reporting asteroids. So, yeah, that’s why I have all this fancy gear. I’m just trying to keep you safe.
But can I really make a difference? I spend a huge chunk of my day at this or that computer keyboard. Now, that isn’t a complaint. No way! I exist within a 100% Apple iPad and Mac ecology, so life is good. I help the great Murdoch McRae narrate my science-fiction novels each morning, and walk my dogs around noon. After lunch, I tackle whatever book I have in progress. Late afternoon allows yard work, and evenings offer multiple choices. If it’s cloudy, I can process asteroid tracks or astrophotography data. Or I can watch some awesome science fiction film!
OR! Aha! If the sky is clear and the temperature holds a tad above freezing, I can break out a telescope and wander the universe. And by “break out,” all I need to do is simply open the observatory’s roof! Oooooh, what treasures await?

Mission 1: Astrometry.
Imagine a game of I Spy in the Sky! This involves taking several image sequences and comparing the stars to see if anything new is moving across the field of view. How cool is that? The techniques involved have to be precise, and I enjoy charting each asteroid. Not that I realistically expect to find something new! Nope. It’s hard to compete with all the professional (robotic) observatories and NASA satellites! Hmmm. Maybe I need to launch my own orbital platform?
Okay, my equipment doesn’t need to be THAT cutting-edge! In fact, I’m still using the Celestron 11-inch SCT I picked up way back in 2001. Of course, the optical tube now rides a Losmandy G11G equatorial mount … so that’s a plus. And I’ve altered the scope’s optics from f/10 to f/6.3, so I can now record a relatively wide chunk of the sky. For now, this involves using a ZWO ASI533MC Pro camera along with an 80mm guide scope. An expected upgrade this year should allow us to boost resolution with an ASI533MM Pro. (SO, that will be a change from “one-shot color” to monochrome or narrowband imaging.) It’s such a thrill to track nearby asteroids and even a few minor planets out beyond Pluto!
Once I collect these images, I use synthetic tracking to enhance each moving target’s signal-to-noise ratio. Shared data from Harvard’s Minor Planet Center and the Jet Propulsion Laboratory helps identify and update each track. It’s fun to see and add to the information coming in from all around the globe. Isn’t it great that so many astronomers are doing their best to monitor these giant space rocks? Don’t even TRY to imagine the damage an impact might cause. And I’m not even talking about an extinction-level event!
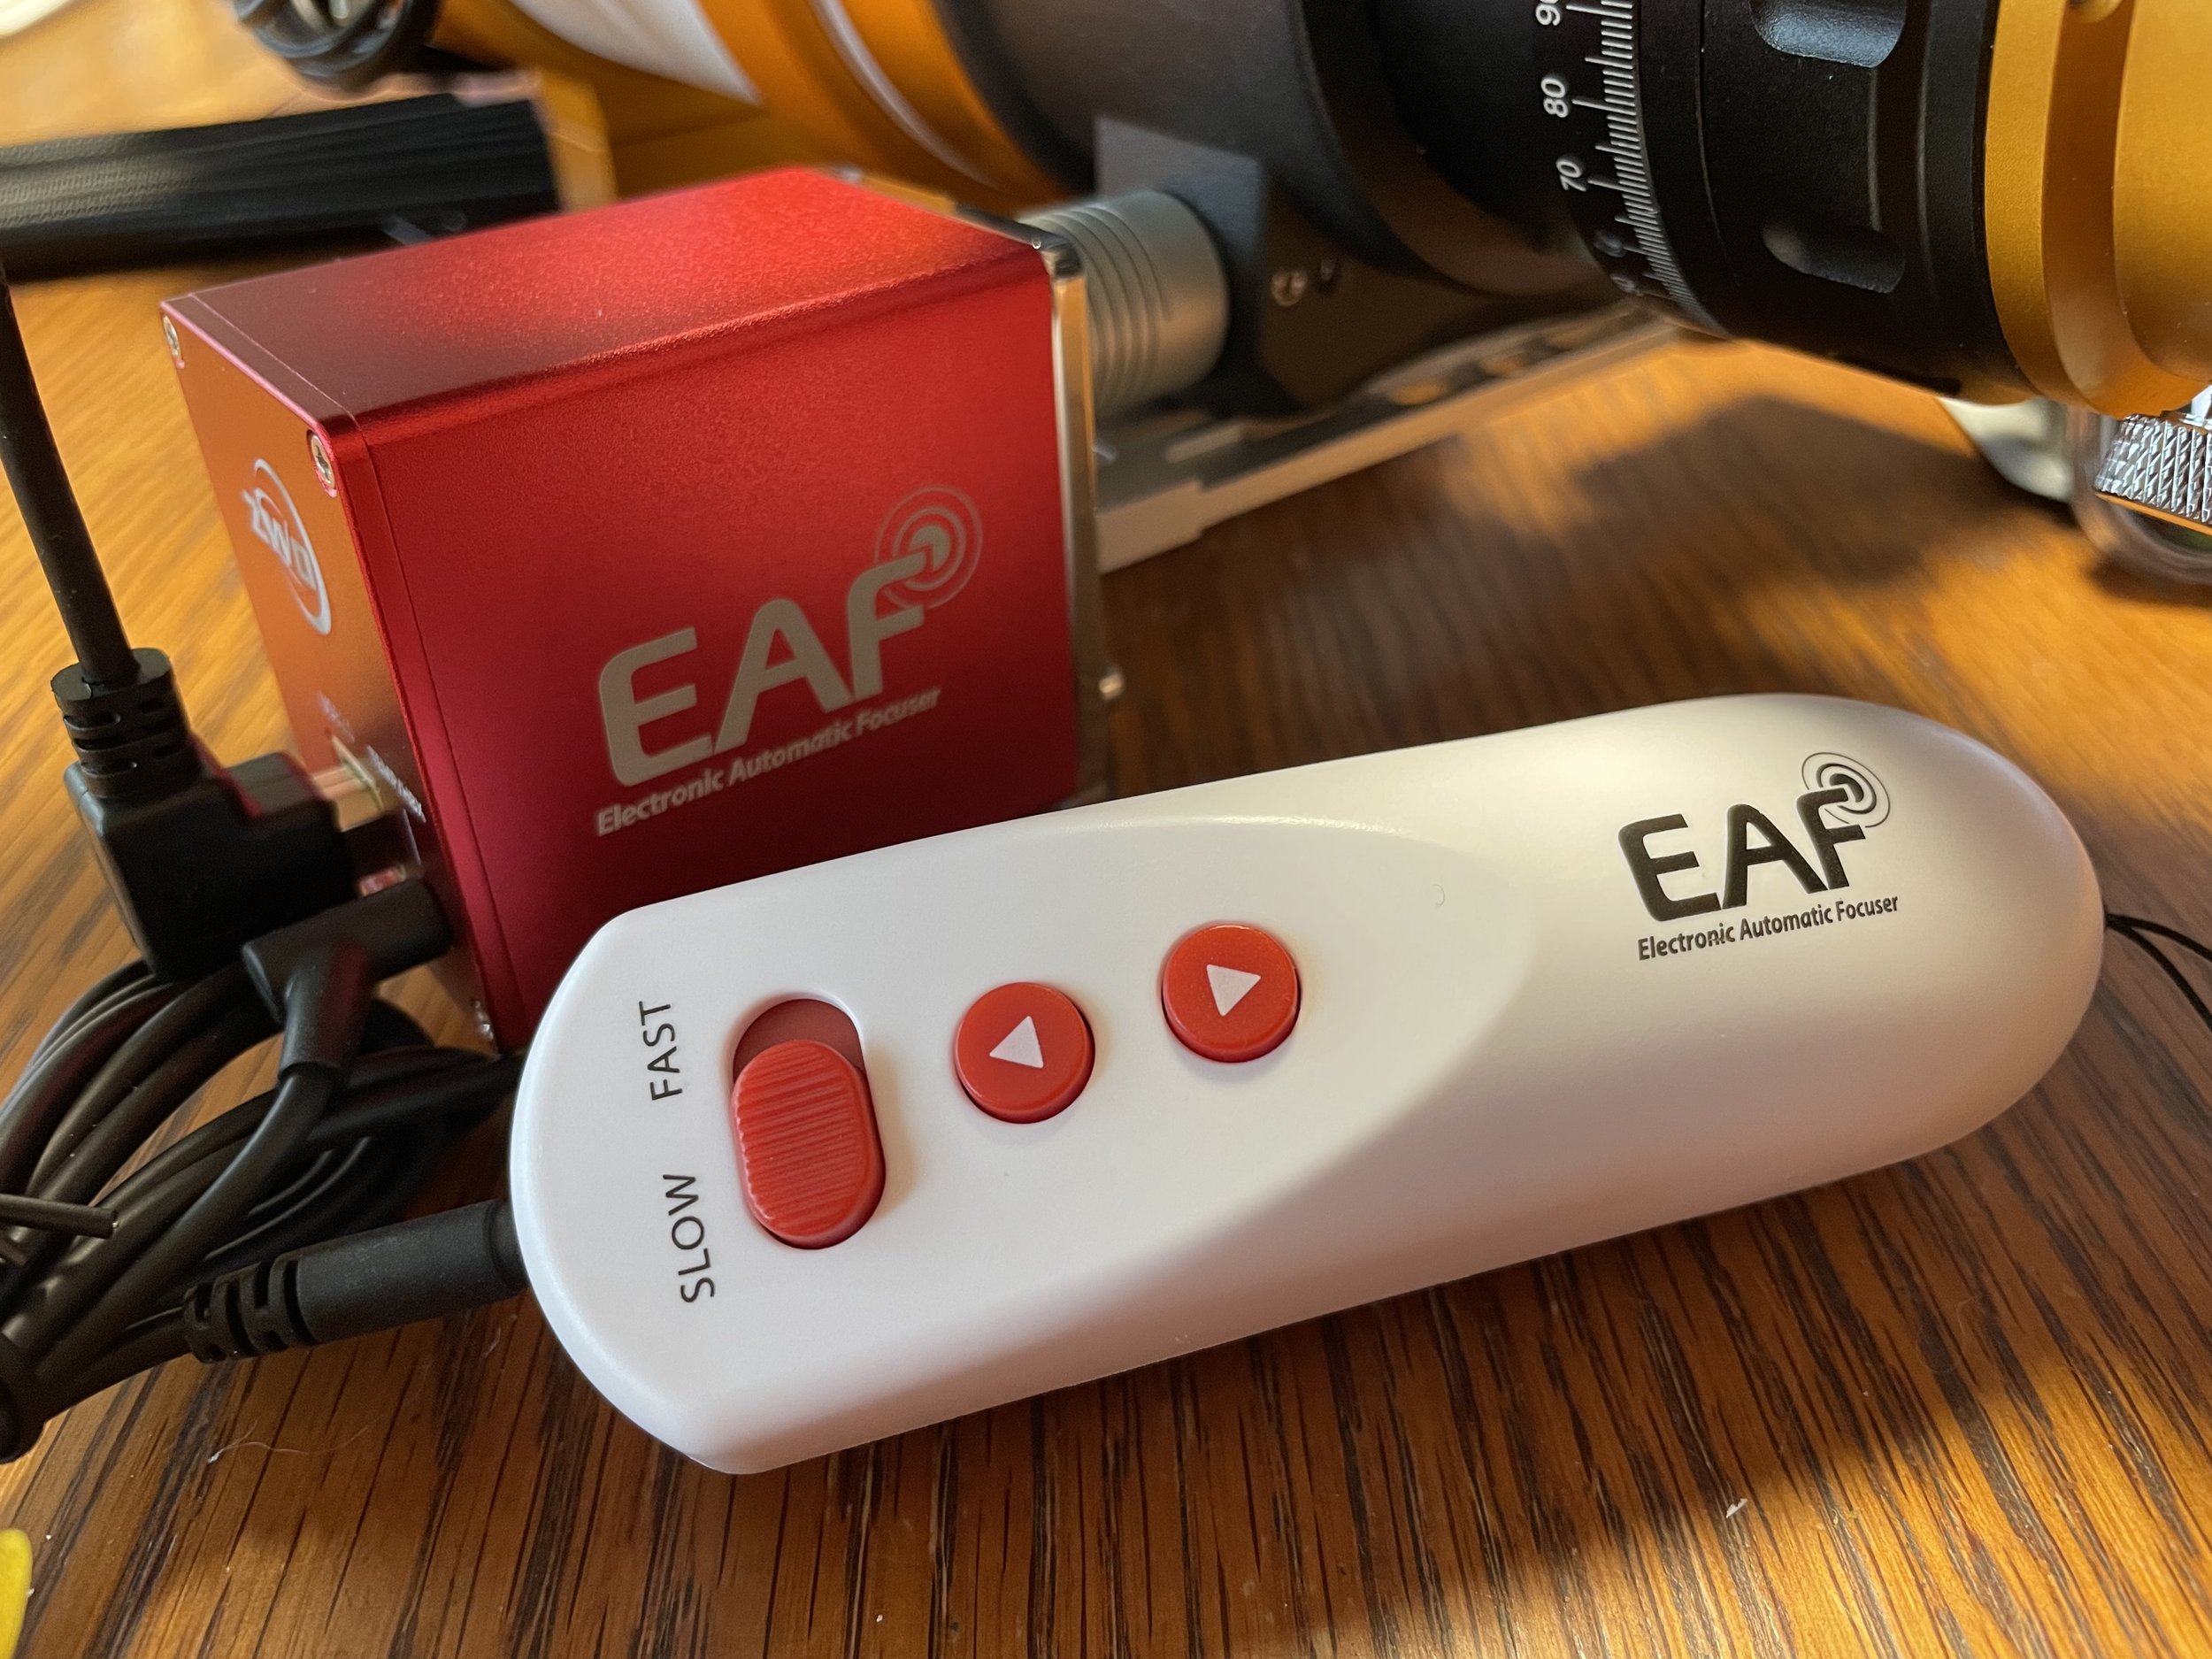
Mission 2: Electronically Assisted Astronomy (EAA).
As my eyes age, it is getting more difficult to tease out the little details from each planet and deep-space object. So, I’ve been selling telescopes and eyepieces. While I’ll never stop using my Takahashi refractor and 18” Obsession for visual astronomy, it’s time to add a little modern technology.
So why not investigate sensitive imaging chips and high-performance cameras? Next, what about some sophisticated image-processing software? What tools should I have on hand for capturing unprecedented levels of detail and clarity? As a visual astronomer, I had to be happy with seeing galaxies as faint smudges of light. Very few objects showed structure or even color. Even so, I never got over the thrill of finding something new. (As in, new to me!)
Enter iPads, cell phones, and WiFi-controlled telescope mounts! Even under challenging observing conditions, I can sit in my house while multiple telescopes cruise from object to object. Digital imaging is awesome. I can focus by remote control and adjust each exposure as I like. The display develops each image in real-time, and I can annotate or collect data at my leisure.
So, what is the difference between EAA and astrophotography? While an astronomer might save a screenshot or a night’s acquisition data, EAA does not involve the slightest whim of image post-processing. We do not need any tricky software or complex help from YouTube.
Mission 3: Astrophotography.
This level of astronomy is new to me, so I’m just taking my first steps in this new adventure. While one telescope is scanning for asteroids, I can let my intuition draw me to one deep-sky object or another. Most galaxies require a narrow field of view, while star clusters and nebulae (gas clouds) need image trains with a wider grasp. Different filters might let me extract hydrogen-alpha data or light from specific sulfur or oxygen emission wavelengths. I might even collect HOURS of data throughout several nights and stack them to arrive at one ultimate image.
My learning curve on post-processing sequences seems pretty steep. But how can I sleep tonight? What an exhilarating journey! Will I be able to capture striking images that reveal the mesmerizing grandeur and incomprehensible vastness of the cosmos? Will I want to post some of my work?
Well, wait and see. If all goes well, I will add and describe some of my images. Will my first attempts show exceptional skill? Doubtful. And yet, I can’t help jumping into this with enthusiasm and unyielding curiosity. Not that I expect to catch up with the best astrophotographers I see online. I don’t have that level of aesthetic appreciation or an artist’s eye for ethereal beauty. But I do know what I find awe-inspiring. So, it’s time to couple five decades of observing skill with ZERO days of proficient photographic methodology!

Our first solar image with the Seestar 50! (February 20, 2024 11:45 a.m.)
Location Data
Here in Hawk’s Grove (southeast Wisconsin), we are -5 hours from UTC during daylight savings and -6 after that and through winter. When looking at the night sky, our naked eye magnitude limit is 5.00 to 5.49. So, that puts us in Bortle class 6: “bright suburban” skies. The Milky Way is washed out and I can’t see all the stars in the Little Dipper. The light pollution along Lake Michigan, between Chicago and Milwaukee, is disgusting! Yuck. Even so, technology may come to the rescue. Modern filters can screen out 99% of the unwanted light while passing the wavelengths astronomers want to study.
Here’s how we gather starlight.
And, by the way, this article already discussed some of our visual gear.
The Telescopes, little to big!
These are our main light-gathering instruments, entering 2024.

Do you see Ruffian … supervising from behind the fence?
1. The ZWO Seestar 50 “smart telescope.”
Aperture: 50mm
Focal length: 250mm (f/5)
Image sensor: Sony IMX462, with a resolution of 1920x1080 pixels … yielding a 1.29º x 0.73º view.
This crazy-portable, 6.6-pound telescope reminds me of the small droids in Star Wars. Remember those? The ones that squeaked around underfoot inside the Death Star? It talks and automatically connects with my phone or iPad. As a groundbreaking technological marvel, it almost works totally on its own. All I have to do is hit the ON button and wait for it to connect to my tablet. In scenery mode, it can scope out my neighborhood and check the sky for cloud cover.
In Stargazing mode, it automatically calculates where it is and where it’s pointing in the heavens. Tap on a star map and away it goes! Once on target, it captures and stacks images. Minutes pass. I’m busy and don’t even notice. But maybe I check my screen. The incoming images are surprisingly detailed. Now, this telescope’s main lens is only 2.5 inches across, so it can’t rival my other telescopes. And yet, as I learn astrophotography, I like to think of this little robot as a competitor. With all my fancy gear, can I capture a better image?
In lunar mode, the Seestar provides nice images of craters, mountains, and seas. In Solar mode, it automatically tracks our parent star while recording each day’s sunspots. If you order a Seestar 50 of your own, be sure to use the included solar filter! This thing is so cool! It is battery-powered and even has a built-in dew heater!

This is the William Optics Gran Turismo 81mm Apochromatic refractor. I took this picture during the scope’s “first light” check. This was the first time starlight ever went through this optical system.
2. The William Optics Gran Turismo 81 APO (Gen IV).
Aperture: 81mm
Focal length: 478mm, or 383mm with its field flattener/reducer.
Focal ratio: f/5.9 (f/4.72 w/reducer)
What a marvel of modern optical engineering and precision craftsmanship! While this isn’t my first apochromatic telescope, it is my first “triplet.” One of the GT81’s objective lenses is special FPL-53 glass, so the scope provides razor-sharp images with zero false color. On top of that, each element is fully multicoated with special super-high transmission (STM) coatings.
In low-power (15x) stargazing mode, it delivers a 5.32° field of view. That’s a circle, 11 full moons across! With this scope’s reducer installed, the ASI533MC Pro yields a 1.69° x 1.69° color image with a resolution of 2.03"/px. I really like the telescope’s camera angle rotator, Bahtinov mask cover, and automatic electronically controlled focuser.

Our Takahashi FC100DL on an iOptron AZ-Mount Pro
3. The Takahashi FC100DL Apochromatic refractor.
Aperture = 100mm
Focal length = 900mm
Focal ratio = f/9
This 4.0” refractor delivers the most amazing lunar and planetary views I have ever seen. It was among the first in its production run and was the best of all those reviewed by Koji Matsumoto of Iida City, Nagano Prefecture, Japan. At f/9 it is a little “slow” for astrophotography so I use this fine instrument for general observing while the other scopes are imaging. With a 31mm Nagler eyepiece, it delivers a magnification of 29x and a 2.83° field of view. It remains inspiring with every eyepiece and is perfectly sharp even at 225x (FOV 0.22°), still with zero false color.

Our Celestron 11 telescope on a fantastic Losmandy G11G equatorial mount. The finder/guide scope is an AT80ED. This was the first time I added this scope to the mount for balancing. It’s now standing by for work in the observatory!
4. The Celestron 11
Aperture = 280mm
Focal length = 2940mm
Focal ratio = ~f/10.5 (w/.63 reducer = 1850mm, f/6.62)
This is one of Celestron’s celebrated carbon-fiber optical tube assemblies. With this scope at f/6.62, our camera covers a 0.35° by 0.35° square. This is perfect for globular clusters, planetary nebulae, and galaxies. Depending on binning, it has several resolutions: Bin 1 = 0.42"/px, Bin 2 = 0.84”/px, Bin 3 = 1.26"/px, Bin 4 = 1.67"/px. After nearly 30 years of using non-computerized telescopes, this scope cut down my search time dramatically. I built my first observatory around it and logged — yes, as with drawings and notes — several thousand objects.
The C11’s guide scope is an AT80ED. At 80mm (fl = 560mm) it is right at home riding piggyback. Its dedicated ZWO ASI220MM-mini guide camera delivers a 0.79° x 0.44° field of view.

5. The 18” Dave Kriege Obsession (a Dobsonian reflector)
Aperture = 457mm
Focal length = 2056mm
Focal ratio = f/4.5
Limiting magnitude = 16.0
Resolution limit: 0.31 arc second
Contrast limit: 4.8 arc minute
This might look like an enormous telescope, but I can break it down into several manageable units in a matter of minutes. Really! It even has built-in attachment points for wheels. The main mirror is a slab of glass 18 inches in diameter and three inches thick. So, let’s compare its light-gathering ability to its own 50mm finder scope. A 50mm objective lens has a surface area of 3.04 square inches. Meanwhile this Obsession’s light grasp is 254.5 square inches. That means, the 18” scope is pumping more that eighty time’s as much light into your eye! Magnification is not a problem, either. My 31mm low-power eyepiece yields 66x and a 1.24° field of view. On nights of terrific seeing and sky transparency, I can swap in a 4mm eyepiece for 514x and a 0.10° FOV.
In case you want one of your own, here’s a link to Obsession Telescopes. Dave Kriege makes these here in Wisconsin, and describes this model as having “Fantastic deep sky and planetary images. One look and you’ll re-learn what it means to be excited about astronomy.”

This is a view of my office, where I write my science fiction! (Yeah! I wish!)
The Mounts

1. The Losmandy G11G
This exquisite piece of astronomical engineering represents the pinnacle of precision and stability for all types of astrophotography and celestial observation. Crafted with meticulous attention to detail and cutting-edge materials, the G11G’s unparalleled tracking accuracy and smooth, fluid motion, allows for seamless long-exposure imaging of any celestial wonder I select. Because its advanced control system allows precise pointing, I can effortlessly navigate the night sky with remarkable precision and efficiency. The mount works with my ASIAir+ and SkySafari, so I can wirelessly control everything with my iPad. Used in conjunction with the Grand Turismo 81mm refractor or the 11” Celestron, the Losmandy G11G stands as a testament to human ingenuity and serves as an indispensable gateway to unlocking the mysteries of the cosmos.
Individually hand-tuned for optimum performance
Payload capacity: 50 pounds for imaging, 65 pounds for visual
Tracking (without guiding): ± 5 arcsecond or better (corrected PE ± 2.5 arcsecond or better)
Its Gemini II astronomical computer has a 42,000+ object database
Built-in wizards for polar alignment, periodic error correction, and model building
Goto with accuracies up to 0.5 arcminute
Its dual-width saddle-plate fits both Losmandy “D” style and Vixen “V” style dovetails

Wait a minute! That’s not a telescope mount! It’s my Goldendoodle observatory assistant: RUFFIAN! (Why do I let him use my computer? I knew he would sneak a picture of himself in somewhere!)
2. The iOptron AZ-Mount Pro
I didn’t need two equatorial mounts, so I went with the best altitude-azimuth (Alt-Az) mount on the market. (You can see the mount with the Takahashi somewhere above.) It has a rock-solid “Tri-Pier” tripod and I’ve found its computerized go-to system fast and accurate. Once I level the mount, lock a telescope in its saddle, and provide power, it calibrates itself and uses GPS satellites to pinpoint its location as well as every object in the sky. Every object? Well, since its database holds over 212,000 objects, it sure feels like it!
Payload capacity: 33 pounds, plus an added 10-pound scope on the mount’s other side
Its on-board battery lasts all night, so there’s no need to string electricity to wherever I place the mount
A built-in WiFi adapter lets me use Sky Safari and an iPad for wireless control
Its dovetail saddle accepts both Losmandy and Vixen dovetails
The Cameras
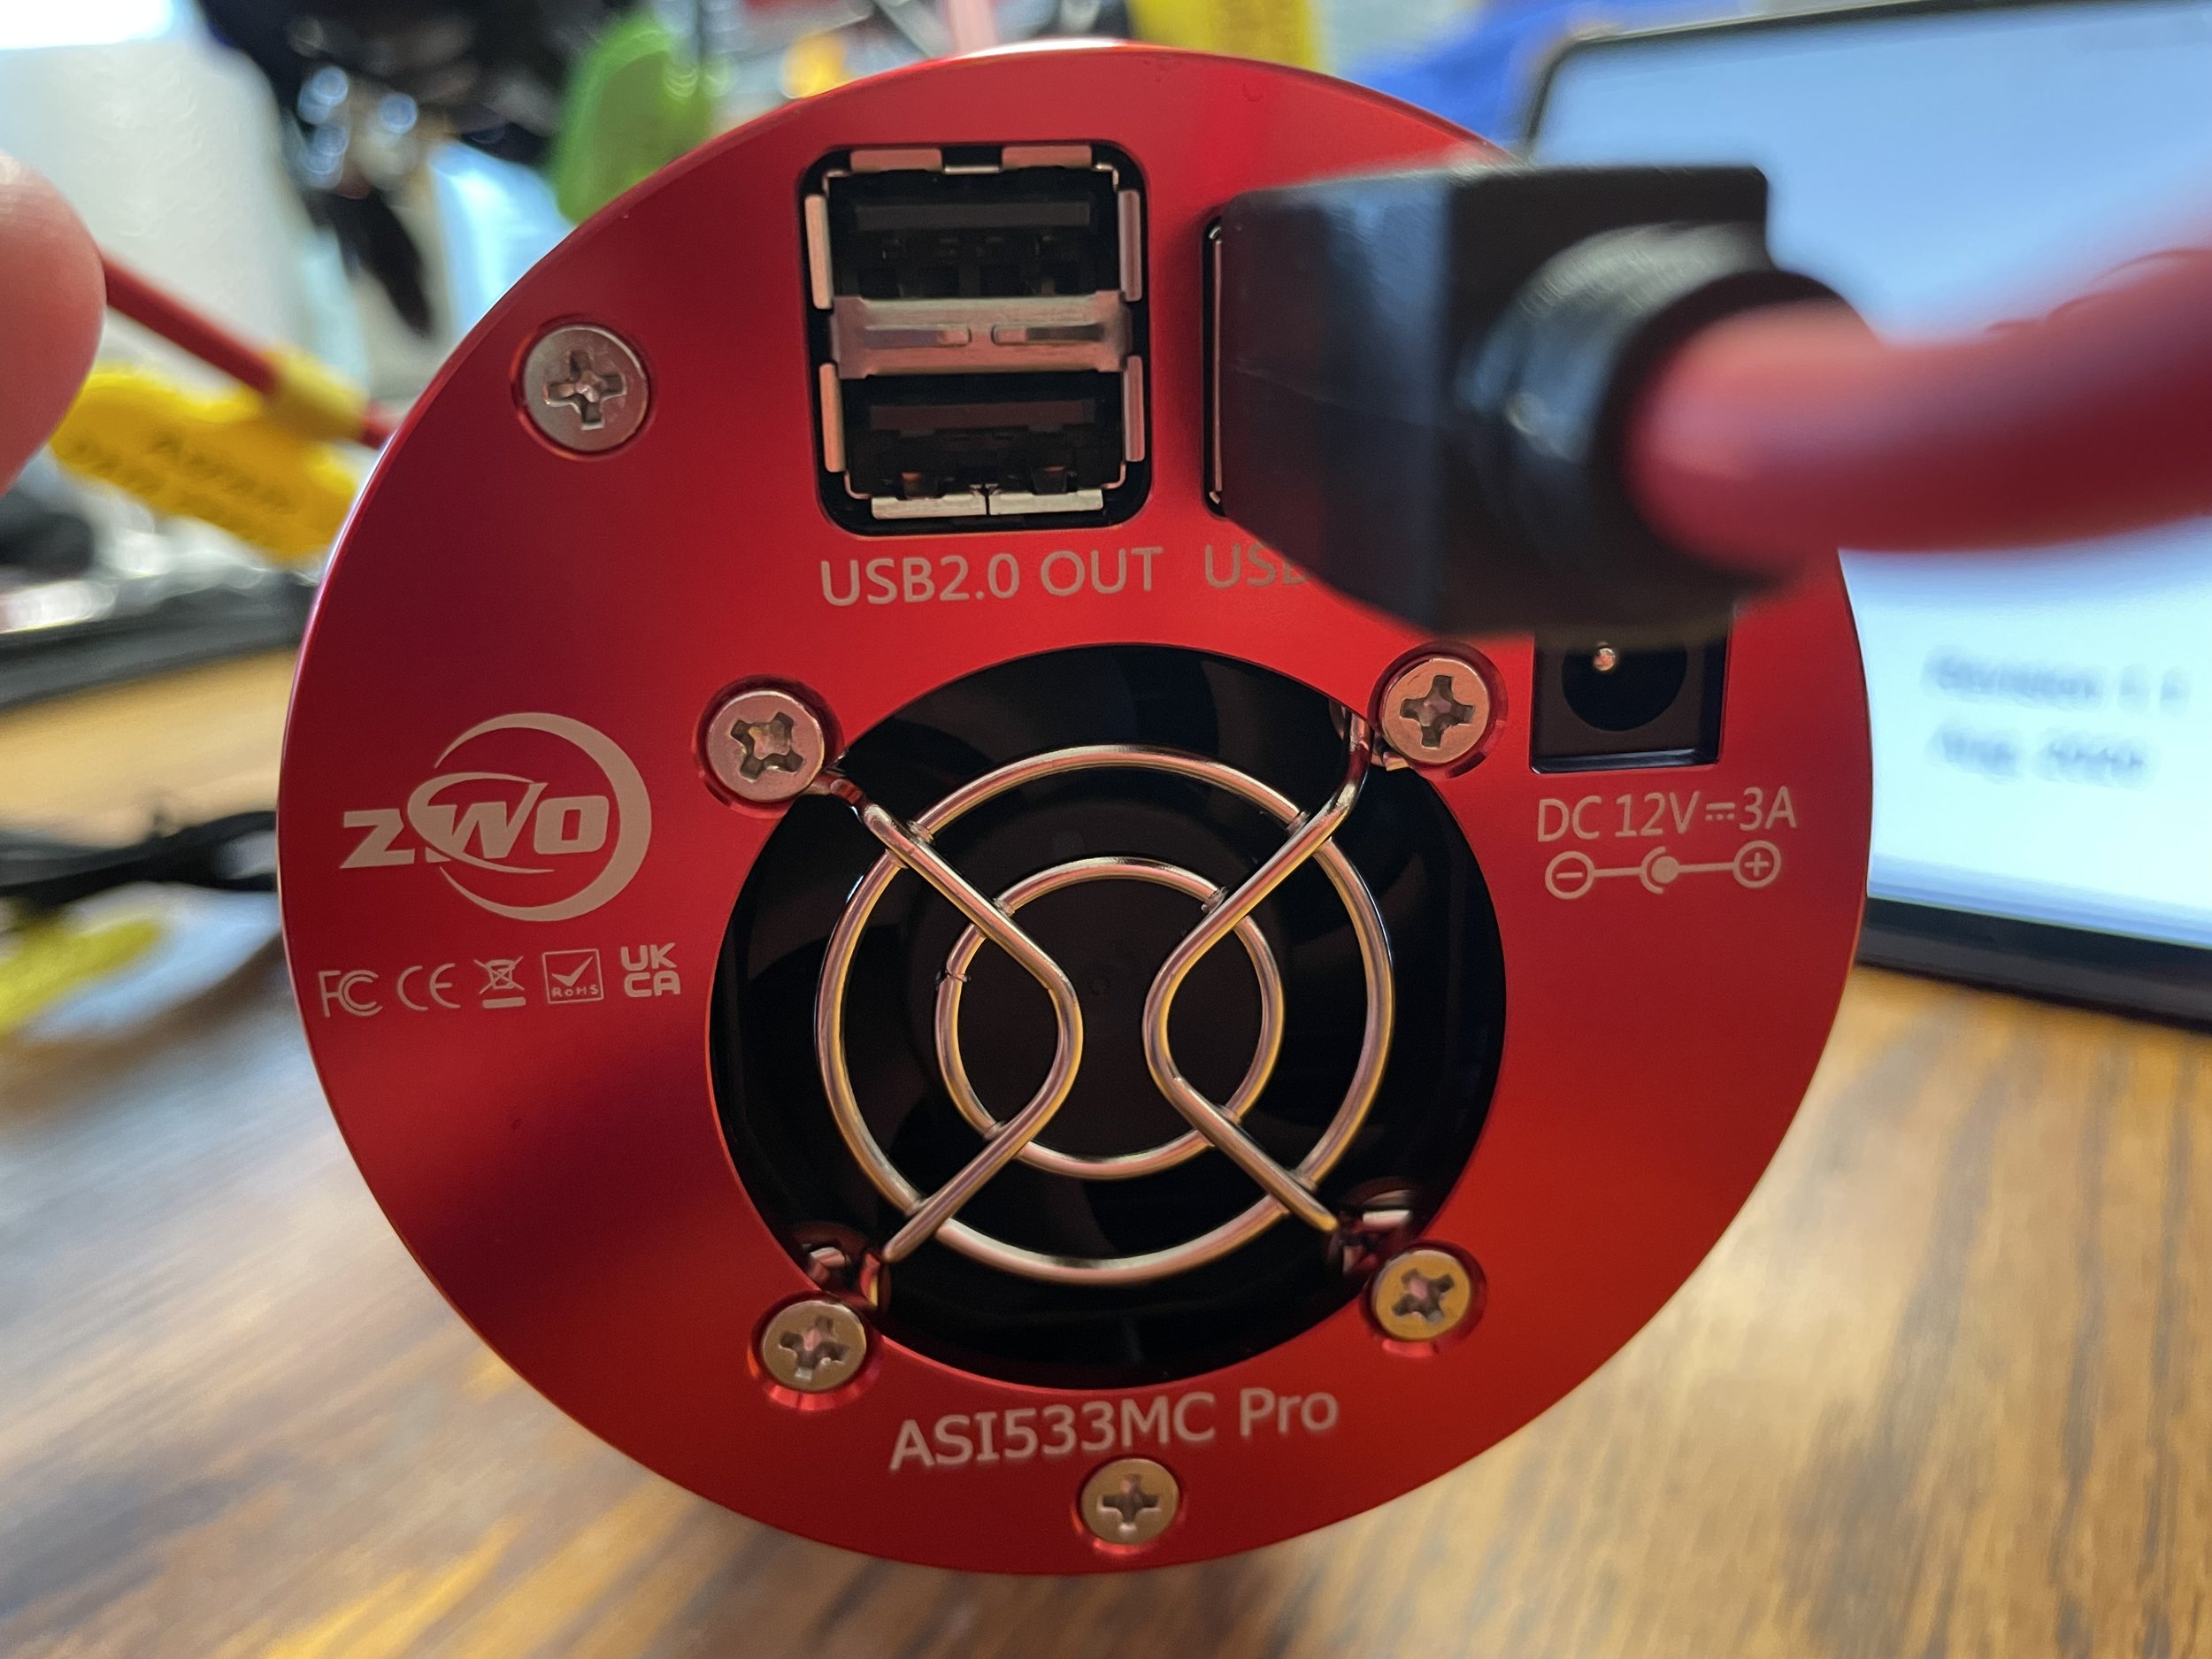
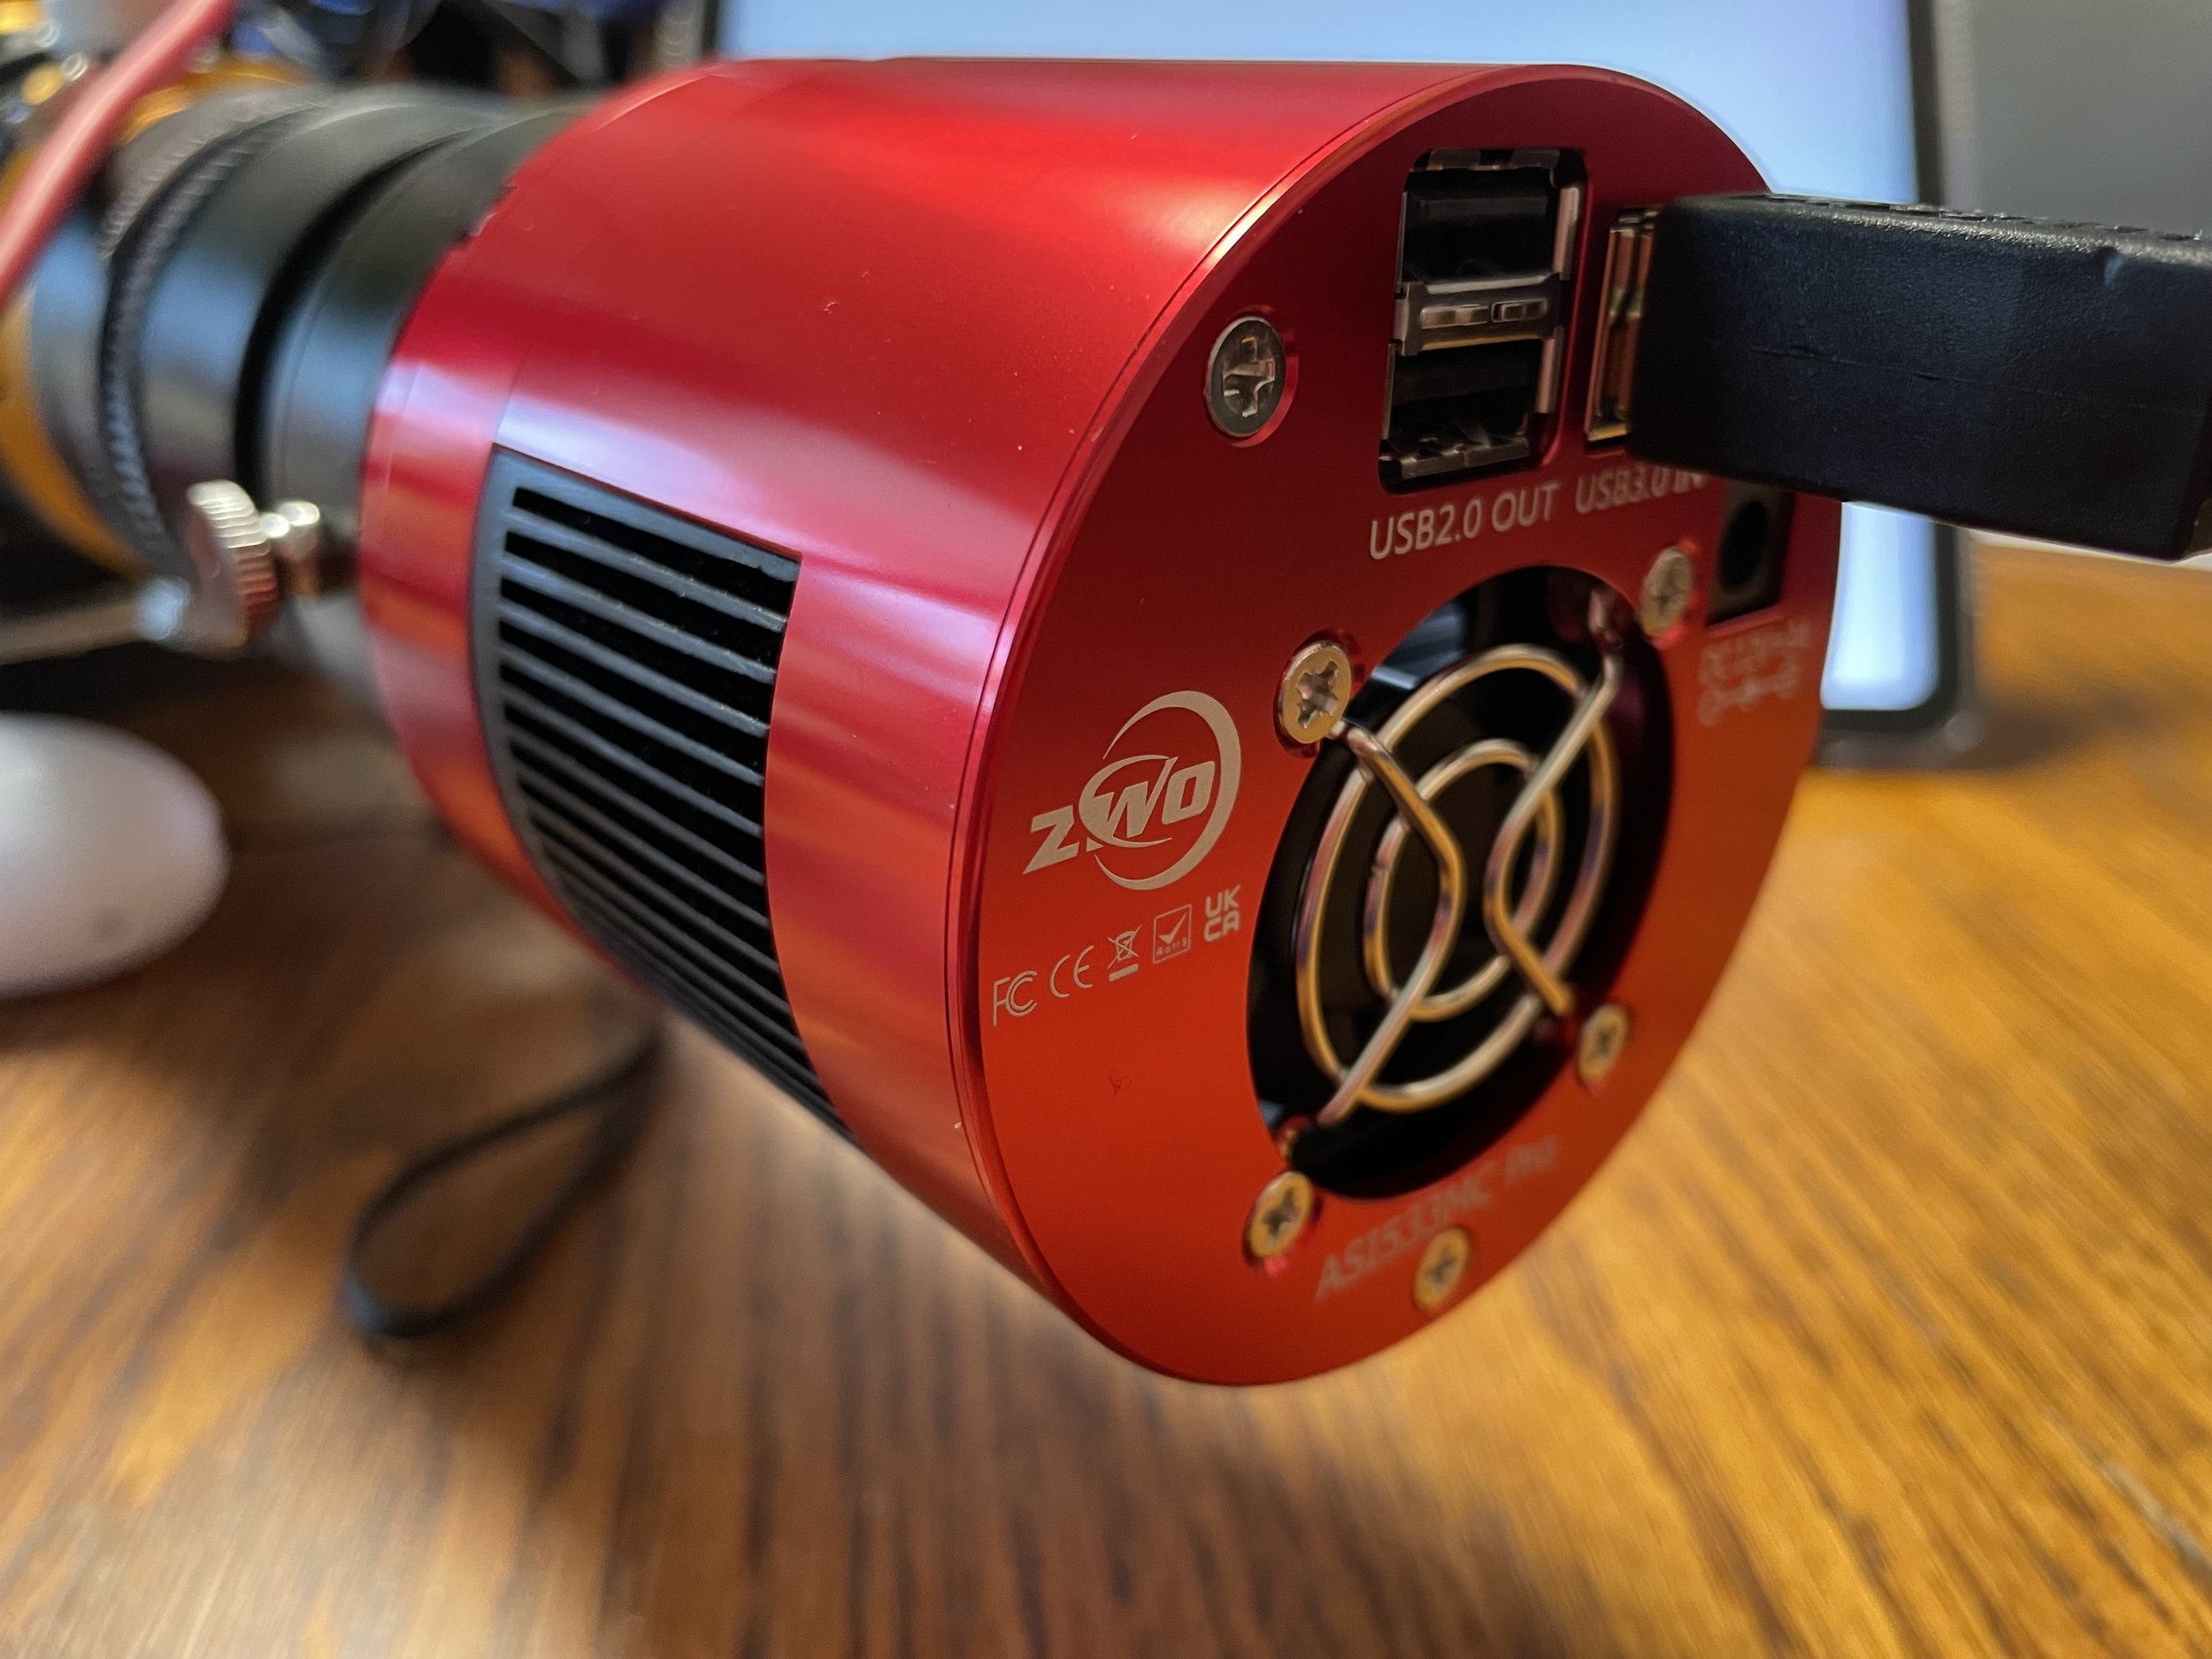


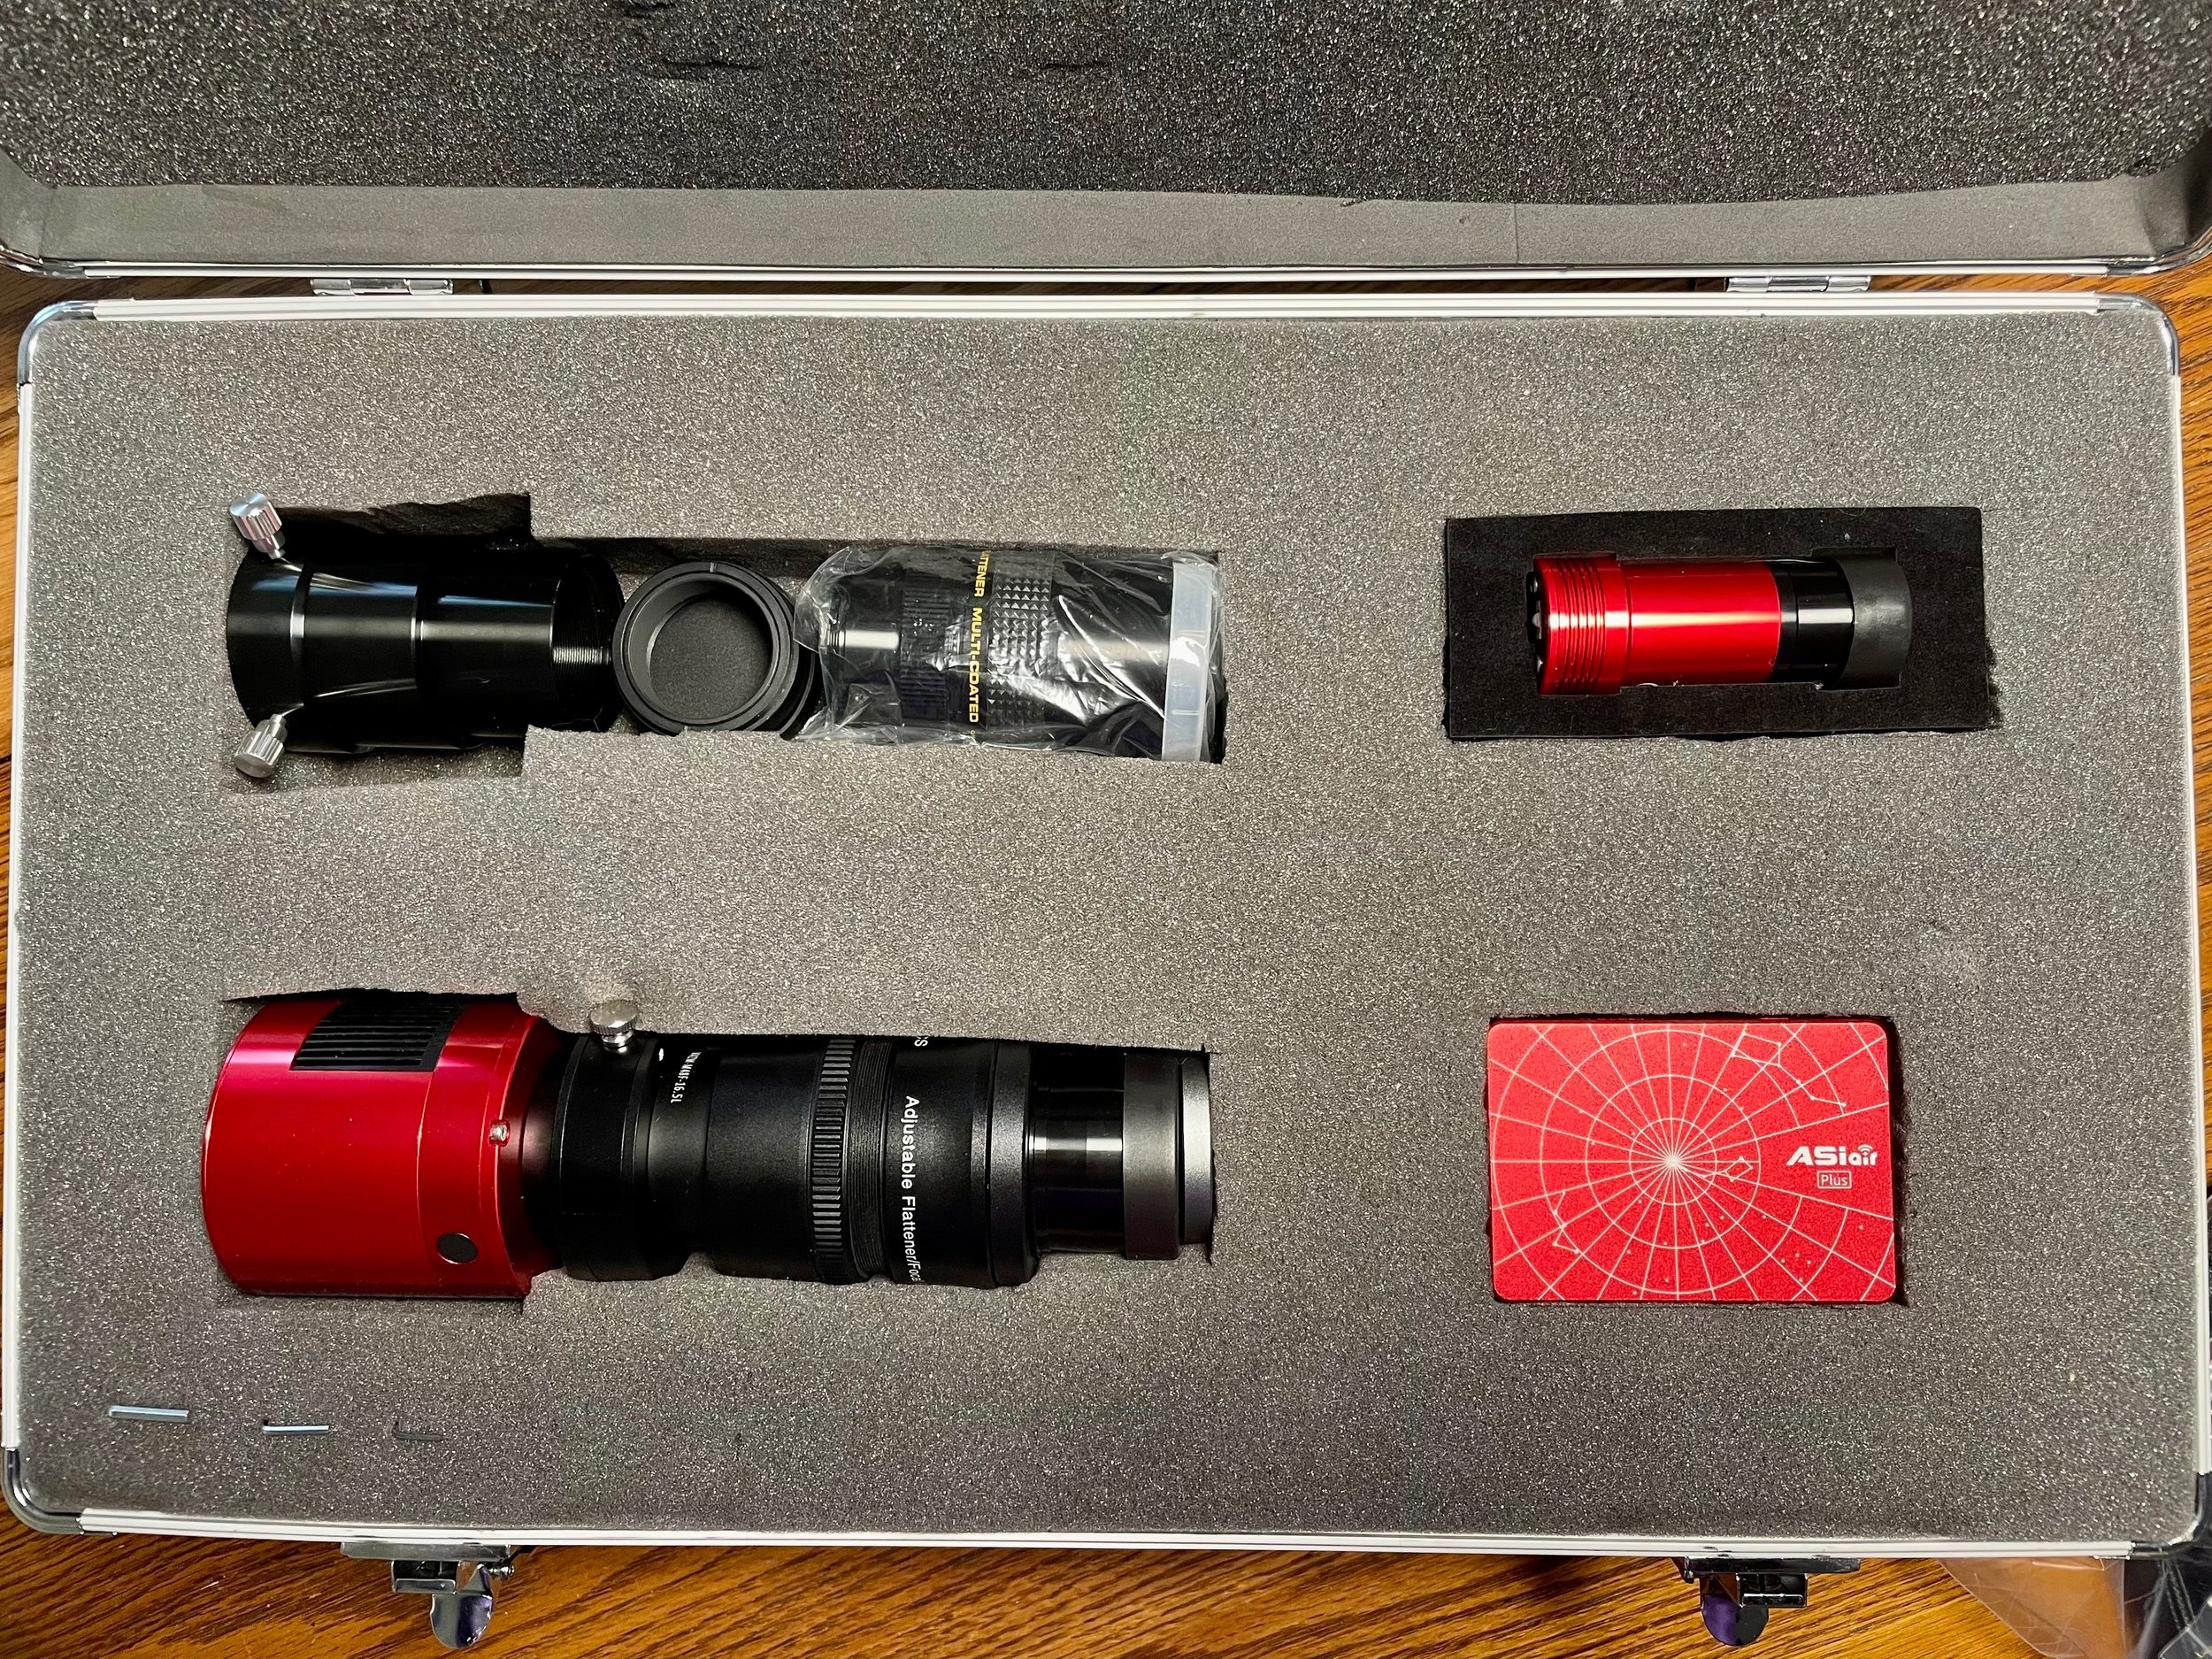
1. ZWO ASI533MC Pro
This one-shot color camera’s high-performance Sony IMX533 CMOS sensor captures stunning celestial images with remarkable clarity and detail. And its included imaging software has even made my first deep-sky imaging attempts look good! One of the best things about this camera is that its zero amp glow circuitry means I can skip taking dark frames if I’m in a rush.
…Pixel size: 3.76 microns
…Pixel array: 3008 x 3008
…Resolution: 9.07-megapixels
…Its 2-stage TEC cooling system reduces thermal noise, with a thermal delta of -35° C
…Conversion process: 14-bit analog-to-digital; 20 frames per second imaging
…Built-in USB 3.0 interface for rapid data transfer
…Dynamic range: 13.7 stops
…The system’s ZWO ASIAir+ onboard computer allows automatic focus and exposure control. This lets the camera “plate solve” to know exactly where it is looking. It can then control the mount while also relaying images and star catalog information to my iPad.
2. ZWO ASI220MM-mini
As our guide camera, the ASI220MM’s large sensor format allows tracking with our GT81 refractor and the Celestron 11’s 80mm guide scope. I have not tried this yet, but some astronomers also use it as a planetary and lunar imager. Because this is a “Mono” camera, it is four times as sensitive when compared to a same-sized color camera.
…Sensor: SS2210
…Pixel size: 4.00 microns
…Pixel array: 1980 x 1880px
…Conversion process: 12-bit analog-to-digital, for 14 fps imaging

Here’s the whole William Optics Gran Turismo 81 (Gen IV) ready to head out for a night of astrophotography!
3. Coming soon: ZWO ASI533MM Pro
This is the Mono (Black and White) version of our color camera. Their sensors are the same size, so I hope to add hydrogen-alpha data to my RGB color images. With its added sensitivity, it will also enhance our asteroid tracking activities.
Maybe someday?
Goals & projects
1. We might gather a few images with the 18” Obsession, but will generally use it for regular planetary and deep-sky astronomy. I love its bright views, especially when I get multiple objects in the same field of view.
2. We’ve found an excellent software package for astrometry that works with Mac computers called “Tycho Tracker.” It “implements a technique called Synthetic Tracking to improve the signal-to-noise ratio (SNR) of moving targets.” After which, it helps identify and prepare precise measurements for each asteroid. At some point, wouldn’t it be nice to discover an asteroid?
3. After more than 50 years of visual astronomy, it is time to learn astrophotography. I have taken pictures of the Moon many times with film and, yes — back in the day (1977) — even glass plates. But we’ve now moved to the big leagues with our new ZWO cameras. Thus, I expect to add images here as I climb this steep new learning curve.
4. I hope astrophotography and astrometry will let my mind wander enough to keep coming up with new writing ideas and devious plot complications. I’m working on Inherit the Night while building all the research notes I need for Never for Ever and Crimson Abyss. Oh, and Murdoch McRae is narrating Orphans of Fire even as I type these words! How exciting!
